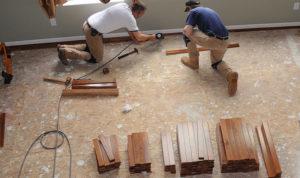
I know how people admire the hardwood floors.
As you’re over here, you and I both know you want to install hardwood floors in your house. However, as rich as it looks, it is also a bit expensive to have it installed.
So, you are paying the price of your hardwood (which will cost you a lot of cash), and you’ll need to pay the guy you’re hiring to install the flooring as well.
Do you know that you can cut down a lot of expenses if you install the hardwood flooring all by yourself? Don’t get scared; it’s not that hard of work to deal with. With the right instruction, you’ll know how to install hardwood floors yourself.
So, if you’re interested, you can follow the steps below, which will help you with your DIY work.
Follow these Steps to Install Hardwood Floor All by Yourself
Measure Your Room
First thing’s first, you got to measure your room. Get yourself a measuring tape and start getting the right measurements of the length and the width of your room.
Hardwood boards come with irregular boards, so you might have to keep 10-15% extra space.
Let the Flooring Acclimate to Your Room
Get the flooring inside your house and keep it in the room (where you’re going do the flooring) for a few days. This will let the flooring acclimate to the climate of your room.
Trust me, it’s a bad idea to install the flooring the same day you purchase it. With patience and ease, you’ll have the best results.
Preparing the Subfloor & Remove Baseboards
Prepare the subfloor where you’re going to install the hardwood. Get rid of the old carpets if you have any. Make sure the floor is nice and level. If it’s not the way you want it to be, get to work and make it level.
Old sub-floors often have old nail heads, so knock them down as soon as you find one. Get rid of any staple or things that are sticking up from the floor. And finally, clean the area using a shop vac.
Laying Out the Flooring
To determine the layout of the flooring, finding the longest straight run in the room will get your job done. If your room is relatively square, you can work off the center of the room.
Underlayment
If you’re done with the layout, you can focus on installing an underlayment. There is plenty of underlayment out there that will save your flooring from warp and cracks. Without an underlayment, you will see the quality of the flooring is being faded away very soon.
Install the Flooring
With everything done, you’re ready to install your flooring. Use a finish nailer to hold the nails in place on your first row. Do you see the edges of the flooring at each wall? It is essential to leave an expansion gap around them.
There’s a reason behind it though. You see, during changes in season and humidity, if your floor doesn’t expand or contract with the changes, it will lose its quality very soon.
To make sure the floor can keep up with all those changes, you have to keep these expansion gaps.
Next, it’s time for you to see if you have any markings laid out on the floor as you went through the layout process. It is to make sure you’ve done the layout of the flooring correctly.
After you’re done with the first few rows, you can use the flooring nailer. You can collect a small piece of the actual flooring and use it as a tapping block. It will help you to make sure that the pieces have seated firmly on their grooves.
When you’re going to start nailing, it is recommended for you to fasten the floor every 4-6”.
Staple the Boards
A nail gun will come pretty handy in this situation. All you need to do is, strike the edge of the board firmly after placing the gun lip over the edge of the board.
Alternate Pieces from Different Boxes
Different boxes of flooring may have different colors. Match the colors with your room. Make sure each room has the perfect color combination. Sometimes, people make a common mistake. They end up putting different shades of flooring in one room, which looks odd.
Face Nail the Final Row
As you work your way through all the rooms, you’ll eventually go to the final row. Keeping the boards closer to the wall as much as you can, face nail the boards.
Install Floor Transitions or Thresholds
Now, for the last part, it’s time for you to install any threshold or transition pieces. You can find it separately in the market, just talk to the retailer you’re going to buy your flooring.
Final Words
Well, that was all about how to install the hardwood floors yourself. Yes, it might be a little tricky, but with a bit of patience and hard work, you can do it all by yourself.
As you’ll see your floor shine and your house is having a posh look, you’ll know that all the hard works were worth it.
This is Autem Decker. Main Author of ‘TheHomeDigs‘. You may not find her on the list of top 10 contemporary Canadian interior designers, but everyone who knows her says she was born to be an interior designer.
She makes her plan in her head and draws them in her years-old diary with a note in the corner. The way she plays with color and shape amazes us.
Connect Her On – Twitter